Having just reviewed the JVC’s entry-level DLA-X35 home cinema projector, we were more than happy to get stuck in with the company’s step-up DLA-X55 model.
This projector (also marketed in the UK as the DLA-X55R or DLA-X55RBE) is priced at around £5000. Adding to the feature set of the £3000 DLA-X35, this step-up version, on paper, appears to be a worthy upgrade. Most importantly, the claimed contrast performance is rated higher than the X35, and the JVC X55 also includes the firm’s “E-Shift 2” technology, which has lead to some confusion over whether or not it’s actually a 4K projector (it’s not, but the technology is an impressive stop-gap until real 4K becomes affordable). We’ll go into that technology, how it works, and the difference it makes to picture quality, in-depth. Additionally, the X55R features a colour management system (CMS) for calibration fine-tuning which we’ll also use to squeeze every drop of performance out of the projector.
Does all of this translate into a more satisfying home cinema experience? Let’s find out.
| Display Technology | D-ILA (LCOS) |
| Approx. Lamp Life | 4000 hours (5000 in eco mode) |
| Lamp Product Code and Approx. Price | PK-L2312 / ~£230 |
| Lens Shift | Yes, H+V |
The DLA-X55’s design is much the same as the X35. It’s a little bigger than older JVC projectors and less curvy, but is relatively inconspicuous, as a projector ideally should be. The lens controls are all motorised, so there’s actually no need whatsoever to ever touch the projector after it’s been installed.
There isn’t a motorised lens cover on the DLA-X55RBE – for that, you’ll need to go one step up the range to the X75 – but JVC does supply a plastic lens cover with the projector, which easily slips into place.

The remote is JVC’s usual, and is a fairly cheap-feeling unit which is functionally complete, with discrete input and picture mode buttons, as well as backlighting.
 |
| Rear connections on JVC X55 |
JVC’s menus are clear, for the most part logically laid out, and respond suitably quickly to user input. There is a decent number of redundant picture modes and options, though, which we assume are to create the illusion of a more complex product (all we’re interested in is accurate picture quality, remember). The top-level adjustment is the [Picture Mode], and in the out of the box setup, “Film” is the most accurate option. There’s also a strange [Color Profile] setting, which is like a picture mode within a picture mode. Control over the [Color Temp.] (Greyscale preset mode) and [Gamma] are given.
![[Picture] menu](https://www.hdtvtest.co.uk/news/wp-content/uploads/2018/04/hardware_JVC-DLA-X55_menu1.jpg) |
| [Picture] menu |
The company has also made some attempts to repackage the Greyscale and Gamma controls in a way which makes sense to everyday users, rather than only to calibration technicians. The results are called [Picture Tone] and [Dark/Bright Level] respectively. We imagine that the end result of these will probably be to impress consumers and give them a sense of satisfaction derived from greater control, but actual calibration requires a scientific approach. We’d hope that at the £5000 price point, any JVC DLA-X55R owners will spend the few extra hundred pounds and have their projectors professionally calibrated… it’s approaching false economy not to.
![[MPC] menu](https://www.hdtvtest.co.uk/news/wp-content/uploads/2018/04/hardware_JVC-DLA-X55_mpc.jpg) |
| [MPC Level] menus |
There’s a second Advanced picture menu which branches off into controls which control the [MPC Level]. MPC stands for “Multiple Pixel Control” and contains a variety of what are, in effect, sharpness controls. We’ll discuss these in detail when we talk about the E-Shift output mode later in the review.
There’s also control over Noise Reduction. [RNR] is the control for “random noise reduction” (it’s a temporal smoothing control which is on by default – make sure to turn this off to avoid film grain and other random motion being filtered out). JVC’s in-depth gamma editor is here too, as is a colour management system. The five “User” picture modes can have custom names assigned to them in the [User Name Edit], and control over the manufacturer’s [Clear Motion Drive] (motion interpolation) feature is given – we’ll go into this when we assess motion resolution later on. Finally, we have control over the [Lens Aperture] for reducing or increasing the amount of light leaving the unit, and a [Lamp Power] switch (Low/High).
The Lens control settings are all fully motorised, and are contained within a separate menu page. As with the entry-level X35, the X55 has five lens memories which can be used to save different position, zoom and focus settings, which is useful if your setup features a 2.35:1 scope ratio screen and you want to accommodate different aspect ratios in this way.
Note: Our JVC DLA-X55RBE review sample was calibrated using Calman Professional, the industry-leading video calibration software. These measurements reflect the projector shooting into the lens of our colorimeter.
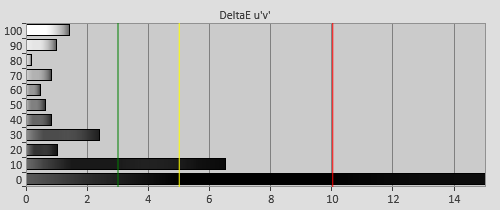
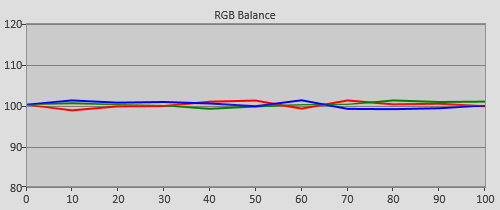
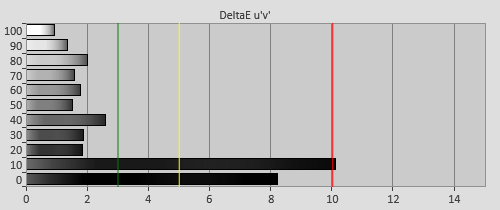
For some unknown reason, JVC has shipped both the DLA-X35 and the DLA-X55R with their “Film” mode – that’s the most accurate out of the box preset – set to a default colour temperature of 6000k. That results in a more reddish picture than the HDTV (and indeed, SD TV) standard of 6500k. As a result, the most accurate preset mode has a red tint:
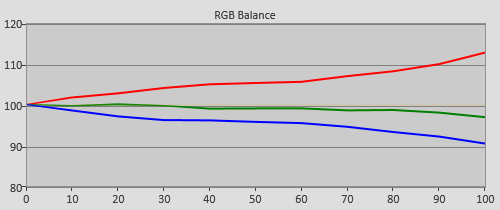 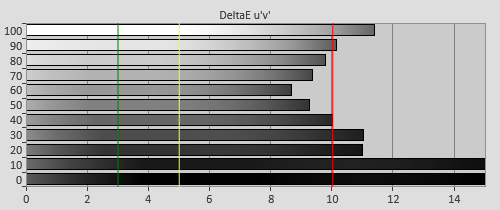 |
| Pre-calibration RGB tracking and delta errors (dEs) |
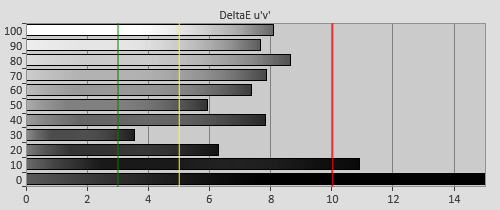
Calibrating our DLA-X55 review sample wasn’t difficult. In fact, using our Klein K-10 colorimeter and CalMan software, we honed in a consistent (linear) colour of grey by making just a few adjustments to the “Custom” [Color Temp.] settings. The result was essentially perfect with no detectable excesses of colour contaminating the projected image. What’s even more impressive is that we didn’t even have to manually alter the Red/Green/Blue gamma curves in that menu to achieve this result – this is done entirely with 2-point Greyscale adjustment, which means that the JVC X55R – at least at this early stage in its life – has very linear, high quality Greyscale tracking. Of course, the gamma menu can be used for finer precision should it be necessary as the unit and lamp age.
That’s in contrast to the cheaper DLA-X35, where we had to work harder to get linear Greyscale tracking. In particular, on that projector, we had to make some more in-depth adjustments in the shadowed areas of the picture to avoid colouring them red or blue. That just wasn’t a problem on the X55 – our review sample was much easier to calibrate.
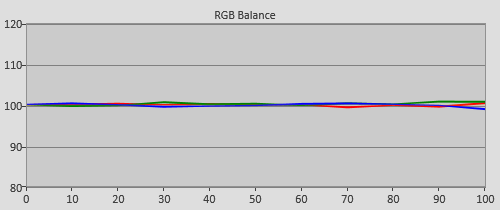  |
| Post-calibration RGB tracking and dEs in [User1] mode |
![Pre-calibrated Gamma tracking in [User1] mode](https://www.hdtvtest.co.uk/news/wp-content/uploads/2018/04/hardware_JVC-DLA-X55_pre-gamma.png) | ![Post-calibrated Gamma tracking in [User1] mode](https://www.hdtvtest.co.uk/news/wp-content/uploads/2018/04/hardware_JVC-DLA-X55_post-gamma.png) |
| Pre-calibration gamma tracking (avg. 2.04) | Post-calibration gamma tracking (2.4) |
The “Film” picture mode defaults to a Gamma setting which is descriptively titled… “B”. This results in rich blacks, but exaggerated midtones and highlights. The picture does seem brighter, but also a little greyer, as a result. Changing [Gamma] to “Normal” makes a big improvement and results in a more consistent distribution of light output from the projector, which measured at around 2.1. In our opinion, that’s still a little low for dark-room projector viewing, so we entered the [Custom Gamma] menu and chose “2.4” as a preset.
The “2.4” preset did measure quite closely to 2.4, but in the interests of videophile perfection, we still made adjustments in JVC’s comprehensive Gamma Editor. That resulted in even more accurate distribution of light output. In case you’re wondering, there is still a measurable (but not really noticeable) inaccuracy at the 80% and 90% positions, because the menu controls over these stimulus levels interacted with each other in our review sample. That has basically no perceptible effect on real world images though, and is really just a statistical inaccuracy.
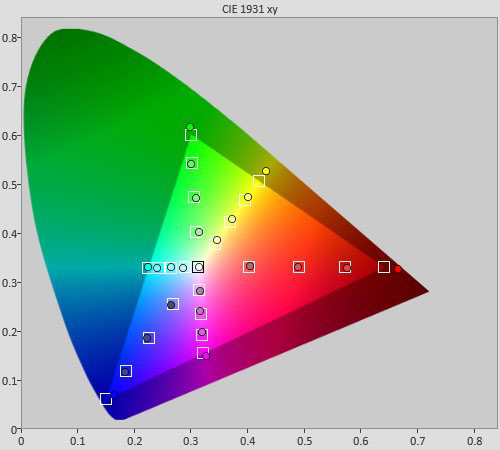
In the default “Film” mode, the DLA-X55R featured distorted colours. In particular, magenta was reproduced as more of a reddish “hot pink” colour. Additionally, the colours were all over-emphasised, being too bright:
![Pre-calibration CIE chart in [User1] mode](https://www.hdtvtest.co.uk/news/wp-content/uploads/2018/04/hardware_JVC-DLA-X55_pre-cie.jpg) |
| Pre-calibration CIE chart with reference to HD Rec.709 |
![Pre-calibration Gamut Luminance levels in [User1] mode](https://www.hdtvtest.co.uk/news/wp-content/uploads/2018/04/hardware_JVC-DLA-X55_pre-glum.png) |
| Pre-calibration gamut luminance (coloured bars = targets; black bars = measured values) |
As we noted, there is a control called [Color Profile], which was the culprit in this case. Changing this to “Standard” significantly improved the Gamut Luminance (above) and solved the “too bright colours” problem (the most troubling), although the off-hue pinks remained.
In the end, there was no preset which cured a remaining error in magenta: only calibrating would do that. We used JVC’s Colour Management menus, together with our measuring hardware and software, to bring accurate colours to the DLA-X55RBE. Strangely, JVC’s colour management system has the option to adjust the “Orange” colour, which we didn’t use: in theory, the commonly measured secondary colours should not even need to be adjusted, since in an ideal system, they should be derived from the red, green and blue primaries. Of course, in reality, things can go wrong, so it’s good to have the option. An adjustment for orange seems totally superfluous to us, though, but as we keep saying, too many options is better than too few.
Our first attempt at calibrating using the CMS was with fully saturated colour patterns. We attempted to reduce the saturation errors that existed at these levels, hoping that the JVC X55 would exhibit linear behaviour, and that the less saturated points would fall into place. They didn’t: adjusting the CMS this way improved the (rarely used) fully saturated tones, but caused severe errors in more commonly used shades. The CMS is not effective over the entire saturation range and using it can actually make the overall colour accuracy worse. Therefore, it’s best approached and used very gently. Any professional calibrator should absolutely double-check with full saturation tracking measurements before calling it a job done.
Once the job is done, though, you can count on outstanding colour accuracy. You’ll be able to see from the green, yellow and red positions especially, the aforementioned 100% saturation excesses that are better left alone. (If you look really closely, you’ll also be able to see that the DLA-X55R can’t produce a fully accurate, saturated blue).
 |
| Post-calibration colour saturation tracking |
![Post-calibration Gamut Luminance levels in [User1] mode](https://www.hdtvtest.co.uk/news/wp-content/uploads/2018/04/hardware_JVC-DLA-X55_post-glum.png) |
| Post-calibration gamut luminance (coloured bars = targets; black bars = measured values) |
As usual, we pulled up our equivalent 3D test patterns, turned on one of the supplied pairs of active-shutter 3D glasses, and attached them in front of our Klein K-10 colorimeter’s lens, so we could measure the colours that the viewer’s eyes will see when watching extra-dimensional content through the glasses:
We used the “3D” preset picture mode for the pre-calibrated measurements, since most users will logically assume this is the one to go for. Interestingly, the picture modes are not tied to the 2D/3D output mode – you can use any picture mode you wish in the third dimension (although some of the calibration options are lessened), and you can even use the 3D picture mode when the projector is running in 2D. Strange, but it gives us more room for manoeuvring.
In any case, here’s how the 3D mode did, measured through the glasses, and running in 3-D:
  |
| 3D Pre-calibration RGB tracking and delta errors (dEs) |
Like so many tri-dimensional products we review, the entire system features a greeny-blue tint, with the amount of red reaching the viewer’s eyes crashing out the brighter the image gets. What’s interesting is that the accuracy is reasonably good in the shadowed areas, and only begins to falter from 40% and up. That’s good, since tints in the shadows are more damaging for overall picture quality.
  |
| 3D Post-calibration RGB tracking and dEs in [User1] mode |
We switched over to one of the “User” presets to calibrate, so we could benefit from flatter gamma tracking. Calibrating using the “Custom” greyscale memories (there are three memory banks, so we used one for 2D and one for 3D) was a cinch on the JVC DLA-X55RBE, and we were soon left with three-dimensional video that was free of any problematic colour shifts. Once we were done calibrating, the 3-D quality looked essentially the same as 2-D, albeit darker, and with more depth (and some occasional crosstalk).
Strangely, pre-calibrated colour accuracy in the 3D mode was better than in 2D. To avoid “death by charts” we’ve omitted the pre-calibrated state, but it’s reasonably good with only the secondary colours being knocked out of alignment. After calibration, 3D fans should have few complaints:
![3D Post-calibration CIE chart in [User1] mode](https://www.hdtvtest.co.uk/news/wp-content/uploads/2018/04/hardware_JVC-DLA-X55_3d-post-cie.jpg) |
| 3D Post-calibration CIE chart with reference to HD Rec.709 |
![3D Post-calibration Luminance levels in [User1] mode](https://www.hdtvtest.co.uk/news/wp-content/uploads/2018/04/hardware_JVC-DLA-X55_3d-post-glum.png) |
| 3D Post-calibration colour luminance (coloured bars = targets; black bars = measured values) |
| Dead pixels | None |
| Panel uniformity | Very Good |
| Primary chromaticity | Good (pre-calibration), Excellent (post-calibration) |
| Motion resolution (approx.) | 300 lines, 600 with motion interpolation enabled (not recommended for films) |
| Digital noise reduction | Defeatable |
| Sharpness | Defeatable |
| Luma/Chroma bandwidth (2D Blu-ray) | Full Luma, Full Chroma |
| 1080p/24 capability | No judder in 2D, subtle judder in 3D |
| Input lag | 70ms compared to lag-free CRT |
| Full 4:4:4 reproduction (PC) | Yes, in all modes |
JVC’s mid-range and higher projectors feature a unique optical system, which is promoted as “4K E-Shift 2”. Its intended purpose is to produce higher-than-1080p images using existing 1080p LCOS chips, by rapidly alternating the position of the projected pixels.
Although some parts of their image processing chain do operate at 4K resolution, there are no true 4K projectors in JVC’s current lineup: they can’t accept native 4K input (of which essentially none exists in consumer hands anyway) and therefore can’t display finely detailed 4K images (the only projector we’ve tested that can is the luxury-priced Sony VPL-VW1000ES). However, one stage of their image processing operates at 4K level. Interestingly, JVC’s UK web site does list these models under a category called “3D and 4K Projectors”, but you’ll notice elsewhere that JVC UK are careful to refer to this high resolution only with the additional wording that it is “achieved with optical engine featuring e-shift 2 Technology”.
E-Shift technology exploits both spatial and temporal means to present a 4K-like image, all while using standard 1080p imagers in the projector. First, the projector takes 1080p video and scales it to 4K resolution at the video processing stage. There are several detail enhancement algorithms at this stage, which JVC calls “Multiple Pixel Control”, or “MPC”, the name apparently alluding to a standard feature of scaling (and associated processing), whereby groups of pixels are analysed so that intelligent guesses can be made when interpolating up to a higher resolution. We’ll talk about this some more in the next section – for now let’s stick to talking about the optical side of the system.
So, now we have a 4K sized image, but we don’t have 4K sized imagers to show it with. This is where e-shift 2 steps in. That 4K-sized image is cut into two sub-frames by subsampling it in a “quincunx” pattern, which alternates on each sub-frame. Remember, 3840×2160 (one of the resolutions referred to as “4K”) is exactly double that of the Full HD 1920×1080. That means that the video processor can move through the 4K-sized image in a diagonal zig-zag using half of the pixels, getting us back to 1920×1080. That pattern is then repeated for the second sub-frame, only this time, the pixels that were skipped over for the first sub-frame are selected instead.
These two sub-frames are then displayed on the high-speed 1920×1080 LCOS chips in rapid succession, in the same way that the Left and Right eye components of 3D images are during stereoscopic 3D display (they’re temporally interleaved). The first group of pixels (the first sub-frame) would be shown, and then a split-second later, in the same position, the second group.
The two sub-frames are displayed so quickly that, for the most part, the human visual system sees them as one complete image, thanks to persistence of vision. However, high-speed drive (the temporal element of e-shift 2) is not enough to give the impression of a higher resolution output. It’s not enough for the additional pixels to be displayed briefly in the same space as the original ones – that would degrade the resolution, not improve it. The second sub-frame has to appear at a slightly different position on the screen.
This is achieved by exploiting a property of polarised light called birefringence, not by physically moving the panels (thank goodness). A separate component in the optical path (JVC calls it the “e-shift device”) causes the image to be optically shifted down and to the right by approximately half a pixel, in time with the LCOS panels drawing the second sub-frame (similarly to how 3D active shutter glasses deliver the two sub-frames which make up a 3D image to the viewer’s eyes, only instead of blocking light like 3D glasses would, the e-shift device instead moves it, inside the projector). So, two 1920×1080 images are overlaid diagonally offset, creating the effect of a doubled 3840×2160 “Ultra HD”/4K frame. In this way, the 1920×1080 panels can produce pixels in two different positions on the screen, without the panels ever having to move.
One question we’re posed to JVC: given that the projector has the internal bandwidth for 4K video processing, why can it not accept a 4K feed via HDMI, and do its best to display it by sending it through the same e-shift2 system as the 4K Upscaled images? We wondered if JVC had perhaps omitted such a feature because the results would fall too far short of what future true 4K projectors will offer, but in reality, the reason is much simpler: to accommodate 4K input would require a major redesign of the projector, and given that there are no consumer 4K sources, it’s easy to see why this hasn’t been a priority for JVC.
The most pressing question for consumers is, “does it actually look better?” On the whole, yes. Images projected using the 4K upscaling and e-shift2 optical output have the appearance of having higher resolution, and feature smoother diagonals. What’s more, there is hardly any pixel grid visible on the image as a result of the system.
With that in mind, you might be surprised to read that turning on the e-shift system causes the actual resolution, as seen with single-pixel line pairs in resolution test patterns, to drop. Black and white alternating line pairs, used to assess resolution, appear more defined when the projector is operating in its “original” 1080p mode. And yet, with actual content, we still preferred to have the e-shift system enabled. We wondered if the black and white line pairs could cause temporal crosstalk between Sub-frame A and Sub-frame B. Remember, in a resolution test pattern, the lines are packed directly beside each other, and to display this with e-shift, some of the pixels on the imager may be put in a position where they must rapidly switch between white and black. Therefore, we might be seeing lessened resolution with these patterns due to the extreme changes we’re asking the LCOS chips to make. (The idea that static resolution can be impacted by the panels’ motion resolution is a concept that still bends our minds). Real movie content is not so synthetic and challenging as this, which would explain why we had no complaints during actual usage: for example, asking the LCOS chips to change from one extreme of the dynamic range to another (white to black) is a harder task than asking them to draw, for example, similarly coloured pixels in an actors’ face.
And on top of all that, there is also the good old fallback of viewing distance. Even with our test pattern torture test, resolution loss just isn’t visible from a few feet back, where even a good pair of eyes becomes the limiting factor in getting crisp images into your brain. Regardless, the choice of whether or not to use this novel system is in the viewer’s hands. We certainly found it to be beneficial, all things considered, and are still impressed that someone thought of it.
Probably the most important question prospective JVC DLA-X55 buyers will be asking is, “is the contrast performance here visibly better than the step-down X35?” For that, the answer is a surefire yes. As usual, light output from the projector can be tailored to your setup’s requirements via the [Lamp Power], but most of all, the [Lens Aperture] settings. While real-world contrast performance depends heavily on the viewing environment the projector is installed in (if your room has reflective surfaces, kiss goodbye to deep blacks during scenes which contain both dark and bright elements together), you’ll be able to appreciate deep blacks during dark scenes provided your viewing environment doesn’t have any stray light creeping in. In our blacked-out test room, we were treated to some remarkably rich video.
This is all achieved without the use of an iris in the light path. JVC has eschewed the use of these quite vocally, and instead engineers its D-ILA projectors to produce outstanding native contrast. Or, put differently, JVC’s DILA projectors can, internally, reproduce the same excellent contrast ratio all of the time, without employing any light attenuating tricks to artificially dull dark scenes. (We say “internally” because, after the images are shot out of the projector, they are still at the mercy of your viewing environment and any reflective surfaces therein, but that’s not something that JVC’s engineers can fix for you!)
Since we’re on the subject, e-shift has been described by some sources as having an impact on the contrast performance of the projector, but this isn’t actually the case. This marketing (perhaps disingenuously) refers to the “Dynamic Contrast” feature of the MPC sharpening algorithm we discussed above, which should not be touched with a ten foot pole if your goal is to show accurate video. There is no evidence to suggest that the inclusion of the eshift optical engine should improve (or substantially reduce) actual contrast performance with accurate video.
Given that there is a temporal element to the workings of the e-shift system (the panels run in the high-speed drive mode), we wondered if enabling it would degrade, or perhaps even increase, the motion clarity. After testing, we can safely say that it makes no real difference. Motion resolution is not very high on LCD and LCD-derived display devices (LCOS projectors fall into that category), and regardless of whether the e-shift2 mode is activated, the JVC X55R resolves only around 300 lines of motion (assessed with the FPD Benchmark test). That’s enough to display the relatively low 24fps frame rate of movies without much in the way of visible blur (although a few rapid panning shots will appear smeared owed to the lack of a dark frame insertion mode), but not enough to give totally clear motion during high-motion content like 60fps video games or sports.
We’re disappointed that JVC haven’t included any kind of Dark Frame Insertion mode on the DLA-X55RBE. We gather that this has been a feature on previous JVC projectors (before we were reviewing them). Sony offer this feature on their £3000 HW50 projector, and we were huge fans of it there, where it doubled the motion clarity and also brought realistic film-like motion into our homes. (Some viewers reportedly can’t stand the flicker, whereas we absolutely love the look, which evokes memories of the best parts of real 35mm film projection without the other down-sides).
The JVC X55 put a big smile on our faces when we sat down with a stack of the better examples of films on Blu-ray. All of the requirements for a pleasing big-screen movie experience are here: accurate greyscale, gamma and colour properties, no forced video processing to abstract the presentation, acceptable motion clarity, and good quality optics. There are also no motion judder issues, with the DLA-X55R being able to reproduce 24hz, 50hz and 60hz content without judder or bungled attempts at internal frame rate conversion.
Last but certainly not least is the contrast performance, an area in which JVC are ahead of the competition. During hard cuts to black, we temporarily experienced the “Where did the screen go?” feeling, which is something that none of the projectors at the £3000 price point have fully managed for us (at least not without their problematic Dynamic Iris systems in operation, but we’re talking about native contrast performance here).
The combination of the internal 4K upscaling (“MPC”) and the psuedo-4K e-shift output mode resulted in a more filmic image, with smoother diagonals. The difference isn’t night and day, though, with one of the key differentiators being the lack of a visible pixel grid texture on the image, which disappears when e-shift is used. Ironically enough, from a seating position of just a few metres back from the screen, the difference between the two modes became harder to spot, meaning that the decision on whether or not to enable the pseudo-4K mode is hardly stressful: on or off, the projector’s output looks great. We left it on, because from our seating position, we could occasionally still make out a hint of the “chicken wire” effect during very bright scenes when the DLA-X55 was running in its native 1080p mode.
We promised a more detailed explanation of the “MPC” options earlier, so, here goes: these are basically sharpening controls which, going by JVC’s promotional materials, are designed primarily to be used in conjunction with the e-shift feature – they can be used in the normal 1080p output mode too, however. There are a couple of [4K Profile] settings – enabling one of these activates the eshift mode and also selects some pre-designed sharpening characteristics. There is also the “Off” setting for native 1080p output. From our point of view, the different modes are another example of unnecessary clutter; we feel an “E-shift: On/Off” option, plus a sharpening control or two, would be more succinct. Still, too much control is better than too little.
There are three controls over the MPC system, labelled “Enhance”, “Dynamic Contrast” and “Smoothing”. “Enhance” is the only one we ever wanted to use, since it’s the most controlled of the two major adjustments. You might think that our purist view of home theatre would avoid using any feature like this at all, but we need to take the entire system into account: the 3-chip design of the projector inevitably involves some slight softening compared to the razor-sharpness of a 1-chip projector. A small amount of high frequency sharpening can at least provide some perceptual compensation for this. The “Enhance” control has plenty of range too, going from 0 to 100. We never went above 30, which we felt injected some subtle crispness back into images without drawing visible halos.
There’s no such thing as a free lunch, of course. We did find that, with very detailed Blu-ray Discs (that is, those that had plenty of high frequency content to start with), the [Enhance] control could create moiré. The excellent Blu-ray Disc of Skyfall was one example, with fine metal grilles and other highly detailed areas of the picture appearing with the characteristic “rippling” effect. Use caution!
On the other hand, the strangely named “Dynamic Contrast” can produce some truly unappealing results, and we felt that it actually decreased the perceived resolution. It’s basically the mid-frequency cousin of “Enhance”, meaning that it can draw quite thick halos around objects. (We say that it’s strangely named, because it has almost no relation to the identically named on-the-fly luminance shifting features often found on LCD TVs). We recommend leaving it off entirely – the “Enhance” feature is much better suited to achieving the same goal of upping the apparent sharpness.
As for “Smoothing”, we found that adjusting this made very little difference in practice. The manual describes it in a way that makes it sound like it is actually blurring less textured areas of the picture, but we think that in reality, this setting is a threshold control which determines which areas are left alone and are not touched by the sharpening process. In any case, it made very little difference in our tests.
We were satisfied by, but not ecstatic about, the DLA-X55R’s optical qualities. Three-chip projection naturally involves a bit of sharpness loss, since the three tiny panels will never align perfectly. JVC does include precise control for reducing any coloured fringing that results from misconvergence, however, unless you’re moving the the red, green or blue images around in single pixel increments, this will cause a loss of resolution in that particular colour channel, since sub-pixel adjustments involve a scaling step. The company have wisely separated the convergence adjustments into separate single pixel and sub-pixel alignment menus, presumably for this very reason. You can also apply convergence correction in separate areas of the screen, a feature which could perhaps be used to reduce the visibility of chromatic aberrations around the corners of the image (although that phenomenon is caused by the lens, not the alignment of the panels).
Focus across the image was good. Sitting close to the screen, we could make out vertical streaks left by bright objects in the image, most notably around the corners of the picture. The only way to remove these was to defocus the projector. Given that we haven’t seen these on the lower-end JVC X35, we imagine that this is “collateral damage” introduced by the E-shift device (even when that feature is off, the E-Shift “lens” is still sitting unused in the optical path). From our viewing position, we had absolutely no complaints at all about the sharpness, however, and mention this only because we’re interested in the inner workings of the projector.
The DLA-X55RBE is a true 1080p Full HD projector, and can resolve single-pixel details in both the horizontal and vertical directions. When fed a Full HD 3D signal, the JVC X55 reproduces every pixel. However, you won’t be able to use the E-Shift feature in 3D mode, because the doubled panel refresh rate is being used to draw the Left and the Right eye views, rather than the extra diagonal pixel data.
After calibration through the active shutter glasses, we were happy with the 3-dimensional image quality, although the image could still do with some extra brightness. The X55R defaults to having a High [Lamp Power] setting in 3D, but in our setup, we felt that the extra fan noise was too much, given that the increase in brightness over the much quieter “Low” setting was not dramatic.
As in 2D, the DLA-X55 reproduces all frame rates in 3D without any stutter or dropped frames. Like most current 3-D displays, crosstalk is visible, although rarely hugely problematic.
The JVC X55 is a worthy step-up from the entry-level DLA-X35 series. At £5000, it’s significantly more expensive than its £3000 sibling and is of course further out of “easy purchasing” territory, but the extra cash buys very visible performance improvements, especially in the critical area of contrast performance, which is the ace up JVC’s sleeve.
The biggest competitors we’ve seen to JVC’s D-ILA projectors are Sony’s SXRD units (such as the VPL-HW50ES and the VPL-VW1000ES), which from our experience, provide slightly poorer screen uniformity and contrast performance, but achieve a remarkably silky, grid-free image (JVC now manages something broadly comparable, but needs e-shift to achieve it, which isn’t entirely concession-free) and visibly better motion performance, assuming you can tolerate the flicker of their dark frame insertion mode.
We’re happy, but less ecstatic, with the quality of the DLA-X55RBE’s optics. Sharpness in the corners actually fell off a little more than our entry-level DLA-X35 review sample, although this is probably down to unit-to-unit variation rather than an actual problem between the ranges. We also noticed some small vertical flaring artefacts hugging the edges of bright objects (the most banal example being on-screen text), with the effect increasing in the softer corners of the image. However, the falloff in sharpness was much less apparent from our viewing position, and we didn’t see any of the unusual and more distracting focus errors we witnessed on projectors like the Sony HW50, where the softening appeared not in the corners, but in the more visible bottom-centre position of the image (especially noticeable on subtitled films).
Comparisons aside, the JVC DLA-X55R manages excellent performance in its own right, and if you want the supremely deep blacks without any annoying luminance shifting artefacts (which can and will happen even on the best “Dynamic Iris” implementations), D-ILA is the only way to go. With JVC’s reputation for contrast in mind, we can’t wait to go one notch higher and check out the DLA-X75 series!