The Panasonic ST60 has landed, so it’s time for the most requested review we’ve had in months! HDTVTest readers have been asking us to check out the Japanese manufacturer’s midrange 2013 plasma TV for some time now, and that’s no surprise to us: last year’s ST50 series was a bargain in every sense of the word, featuring quality that wasn’t far off Panasonic’s best (and perversely, actually had better brightness in its most adjustable picture mode, so became our favourite).
The 2013 Viera ST model – we’re reviewing the 42-inch TX-P42ST60B today – promises more of the same: it occupies the same midrange slot as always, and features Panasonic’s Infinite Black Pro panel, meaning that we’re promised a certain level of black level performance in dark rooms, and also an advanced anti-reflective screen filter to keep the image rich during daytime viewing.
In Europe, last year’s ST50 featured the “2000hz Focused Field Drive” motion system (US and Canadian models got a “2500hz” rating). The European ST60 now features the “2500hz” version. The TX-P42ST60 doesn’t feature Panasonic’s newer 6-core “hexa processing engine” though, and instead runs off the older V-Real 3D Pro system (apparently running on a chip from Mediatek, as can clearly be seen through the vent on the back, rather than Panasonic’s own silicon). That’s likely to translate into slightly slower Smart TV performance, but probably won’t mean much for picture quality from our purist perspective.
The Panasonic GT60, VT60/VT65, and of course the flagship ZT60/ZT65 are rated at “3000hz”, and add endorsement of both the ISF and THX – although the ST60 series now also features 10-point Greyscale and Gamma calibration controls, meaning that the ISF blessing is less of a draw than in years past since it no longer seems to exclusively guarantee in-depth calibration controls (although the THX accreditation should result in the step-up models having better pre-calibrated colour neutrality, with a similar level of performance being optional on the ST60). They also feature a slightly higher gradation panel driving mode, with the TX-PST60 being quoted as reproducing 12,288 gradation steps, and the higher-up models being capable of 30,720. That should result in more solid-looking shadowed areas with less plasma dithering noise, but we’re not sure if accessing the higher levels of gradation on the higher-up models will have other compromises bundled (we’ll find out when we review them!)
The 42ST60 also ships with Panasonic’s Electronic Touch Pen, which allows you to freeze the television’s image, and annotate it with crude doodles notes of interest, and also to save the results (provided they’re not from an HDCP-protected HDMI source) as JPEG images to an SD Card.
Let’s find out if the Panasonic TX-P42ST60 lives up to the high standards set by last year’s ST50, whether it’s worth investing in, or whether it’s worth scooping a cheap 2012 model to save some cash. Read on!
Note: The specific model we tested was the Panasonic TX-P42ST60B which denotes the 3-pin-plug British version. While we have not seen the 50-inch Panasonic TX-P50ST60B and the 55-inch TX-P55ST60B, there shouldn’t be any drastic difference in picture performance given similar specifications within the ST60 range.
The “Crystal Design” from last year’s ST50 series is gone, replaced instead with a design which is more reminiscent of the step-up GT model: the TX-P42ST60’s screen is framed by a thin piano black bezel, which, in turn, is framed by a chrome outer border. We liked the “Crystal Design”, but this one is plain and good looking, too.
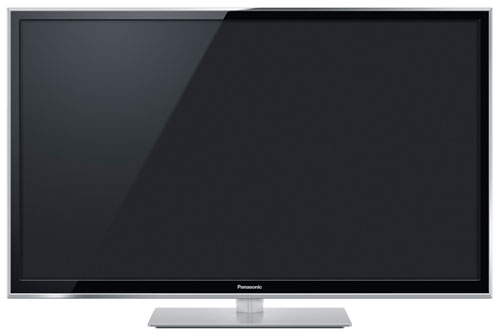
It’s a plain-looking display which feels solidly built, like basically every Panasonic HDTV we’ve tested. It’s also incredibly thin, with its deepest bulge being about 3cm (although the curved design makes it appear to be thinner still). The supplied remote is a step down from last year’s ST50: the neat red backlighting is gone. On the other hand, so is the fingerprint-tastic gloss black finish.
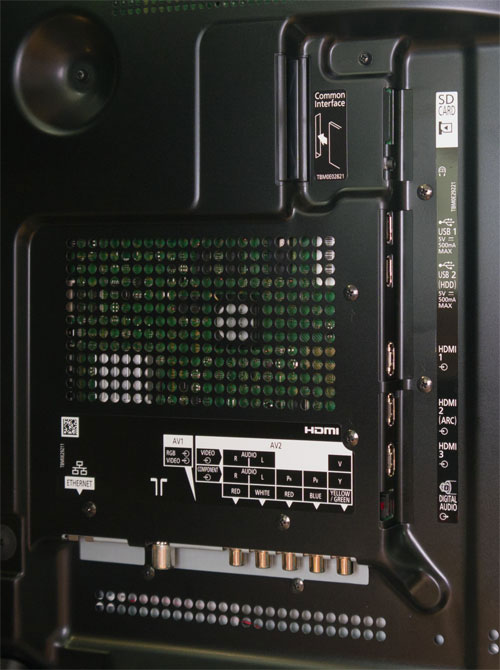 |
| Rear: 3 x HDMI, RGB SCART, Component/Composite shared, USB, SD Card, aerial, audio output |
Older Panasonic TVs (we’re thinking back to around 2009/2010 or so) tended to favour incredibly simple on-screen menus with almost no spurious options whatsoever (a move which seemed to result in them being the last major manufacturer to embrace in-depth picture setup options for enthusiast users – something they’ve more than rectified in recent years). The 2013 models are now chock-full of picture adjustments, some of which interest us, others which we prefer to skip over – remember that our interest is seeing accurate picture quality, that is, nothing added, nothing taken away.
![[Picture] menu](https://www.hdtvtest.co.uk/news/wp-content/uploads/2018/04/hdtv_Panasonic-TXP42ST60_picture1.jpg) |
| [Picture] menu |
As with the first 2013 Panasonic LED LCD televisions we’ve reviewed, we now have a “Custom” [Viewing Mode] option which sits alongside the trustworthy “True Cinema”. There are also “Dynamic”, “Normal” and “Cinema” modes, which alter the picture in a few ways.
Basic picture settings work as expected, and Panasonic’s [Intelligent Frame Creation] system, like last year, has Off, Min, Mid and Max settings. (The same control moonlights as [24p Smooth Film] when 24p input from Blu-ray is sent to the TV, although the setting is independently stored – more on that later).
![[Advanced Settings] menu](https://www.hdtvtest.co.uk/news/wp-content/uploads/2018/04/hdtv_Panasonic-TXP42ST60_picture2.jpg) |
| [Advanced Settings] menu |
The biggest changes appear in the [Advanced Settings] menu. The first control is a [Panel Luminance Setting], a mainstay of American Panasonic plasmas, which we mentioned that we’d love to see make it over here – so good going, Panasonic. Like the US models, it features “Low”, “Mid” and “High” settings. Unlike the American models, this control – at least here on the ST60 – acts as a multiplier for the [Contrast] setting. Changing it at first will appear to make basically no difference, but raise the [Contrast] control to increase light output from the TV, and then change the [Panel Luminance Setting] to give it another boost (although we didn’t even need to move it off the “Low” setting, ironically).
There are [Adaptive Gamma Control] and [Black Expander] settings which we’ll skip, due to our desire for accurate pictures. There’s also a control over [Colour Gamut]: “Native” reproduces the panel’s own range of colours, whereas the “Normal” setting matches the official HDTV colour standard (and is therefore the one we selected).
Moving on, we have 10-point control over [White Balance] and [Gamma] (a real step up over the ST50’s 2-point control over White Balance and preset gamma selection). [Colour Management] (editing of the colour gamut mapping) remains the same as last year, with three-axis control over the Red, Green and Blue outer points, but not the secondary colours. These should fall into place on their own, though.
[Option Settings] features a toggle for “Game Mode” (which can now be applied to any picture mode, rather than being a viewing mode on its own), a [Film Cadence Mode] control for film mode deinterlacing (we’ll explain later), and also a [1080p Pixel Direct] feature. This is where it gets truly weird. On Panasonic’s spec sheets, the ST60 series apparently doesn’t have this feature, but it’s here in the menu. Don’t get too excited though, because it’s not usable! Turning this feature on results in truly heinous sharpening, causing white halos and aliasing to appear in the picture. There is nothing “Direct” about that. On older Panasonic flat-screen HDTVs, a similarly named option resulted in higher chroma bandwidth (extra tiny coloured details being made visible rather than being blurred out). The good news is that on the ST60, that level of colour resolution is there by default. In other words, there is no need to use [1080p Pixel Direct].
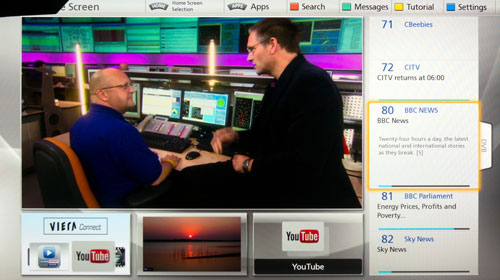
We also can’t discuss menus without talking about Panasonic’s new “My Home Screen” concept. This stacks the TV image on screen alongside calendars, timers and other app shortcuts – it’s a slick, clean UI that’s an improvement on last year’s “VIERA Connect” design:
Note: Our Panasonic TXP42ST60B review sample was calibrated using Calman Professional, the industry-leading video calibration software.
After letting the TX-P42ST60 age for a good number of hours, we strapped our Klein K-10 colorimeter to it, referred it against (profiled it with) an i1Pro 2 spectrophotometer for supreme accuracy, selected the TV’s [True Cinema] mode, and ran some measurements to see how neutrally coloured our untouched ST60’s colour was.
Actually, that’s not true. The first thing we did was scope out the [Contrast] and [Panel Luminance Setting] controls, since where we park these is going to have a direct influence on greyscale tracking (it needs to be set before calibration, not after, for the most exacting results).
It turned out that we could easily hit our luminance target of 120 cd/m2 with the [Contrast] control alone, with the [Panel Luminance Setting] on “Min”. This clipped out only a few of the absolute brightest tones (the rarely used “whiter than white” shades) in the picture. We could comfortably push the [Contrast] control up without clipping too many whiter-than-white shades and get 138 cd/m2 out of the panel on the “Low” panel setting. Pushing that up to “Mid” gave us 158 cd/m2. The “High” setting gave us a smaller increase to 166 cd/m2. However, both the Mid and High settings were partly achieved by manipulating the gamma tracking (“Mid” was acceptable but a little “s-curved”, whereas “High” began to look a little unnatural). Because we had no problem getting a bright picture out of the Viera TX-P42ST60B, we could happily use the “Low” panel luminance setting.
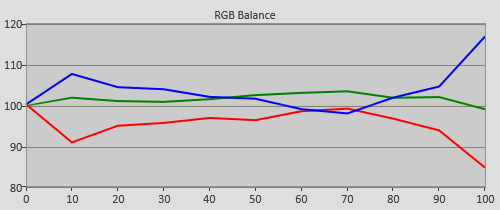
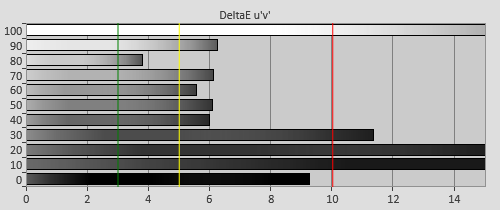
Before we touched anything, the [True Cinema] mode produced fairly neutrally coloured grey shades, although the brighter areas appeared slightly red-tinged. That much of the inaccuracies are in the brighter areas is excellent, since this is where errors are least damaging to the picture. This is very good going for an uncalibrated HDTV, and is an improvement over previous Panasonic plasmas which often arrived with a slight green wash over the picture (last year’s TX-P42ST50 was one of these).
 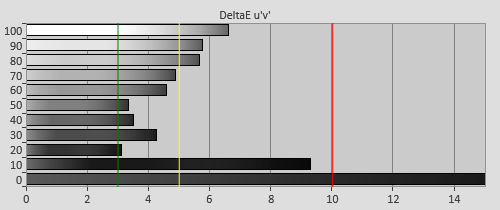 |
| Pre-calibration RGB tracking and delta errors (dEs) |
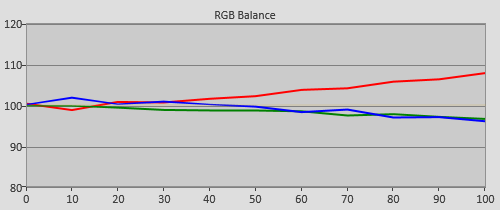
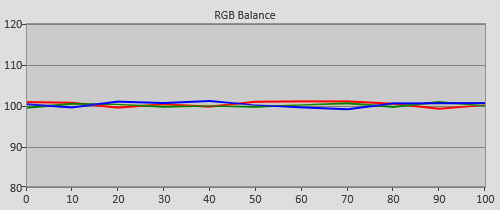
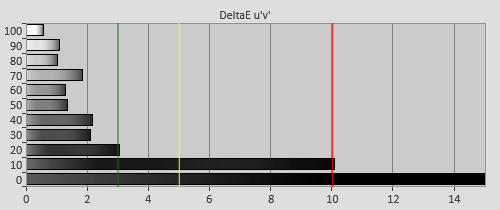
Still, we hope that some users will make use of the ST60’s calibration controls, because the improvement to the neutrality of the picture is worthwhile. First of all, we used the Red, Green and Blue [Gain] and [Cutoff] controls – that’s the two-point White Balance adjustments – to make colour of grey as consistent as possible across the different brightness levels. That, on its own, gave very acceptable greyscale performance, but thanks to the 10-point control, we were able to use greater precision, which helped us get neutrally coloured shadow details as well… with 2-point precision only, we usually find that these have to be left with a slight red or blue tint in the shadows so that the rest of the shades can be neutrally coloured. Not so on the TXP42ST60, thanks to its 10-point white balance control.
 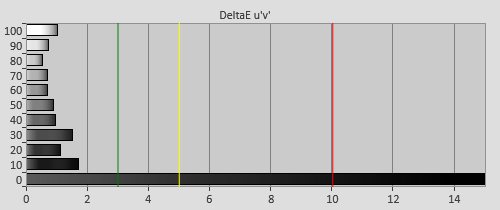 |
| Post-calibration RGB tracking and dEs in [True Cinema] mode |
One thing we should point out is that, like all plasma TVs we’ve ever tested and calibrated, the Panasonic 42ST60’s greyscale tracking does vary with the average picture level. For example, imagine a tiny grey box in the middle of the screen surrounded by black, with the grey box growing over time. On a plasma, the box would actually change colour very slightly and pick up different tints depending on how much of the screen was lit (the APL, or average picture level, of the scene). Case in point: we originally calibrated the 42in ST60 using standard window patterns, but found that actual content appeared with a detectable (to us) green tint, which we confirmed when we remeasured it with the APL patterns on the AVSHD test disc (the APL patterns keep the brightness of the display consistent across each of the different shades).
For that reason, care has to be taken with 10-point adjustments on plasma televisions… or an LCD/LED LCD TV that varies its screen brightness relative to the APL. Lining neutral grey shades up with test patterns is one thing, but if we make incredibly specific corrections, these might turn out to be relevant only for the APL “in use” during the patterns. Professional calibrators will double-check this sort of thing with different pattern types and window sizes, so don’t fret. After calibration, we scrutinised greyscale ramps and actual content to make sure that no unwanted localised tints were creeping through, while accepting that greyscale on plasma is never completely “locked down”.
![Pre-calibrated Gamma tracking in [True Cinema] mode](https://www.hdtvtest.co.uk/news/wp-content/uploads/2018/04/hdtv_Panasonic-TXP42ST60_pre-gamma.png) | ![Post-calibrated Gamma tracking in [True Cinema] mode](https://www.hdtvtest.co.uk/news/wp-content/uploads/2018/04/hdtv_Panasonic-TXP42ST60_post-gamma.png) |
| Pre-calibration gamma tracking (2.2) | Post-calibration gamma tracking (2.4) |
Just as the greyscale tracking varies with the average picture level, so does the gamma. A [Gamma] setting of 2.4 gave us roughly 2.4 gamma with the aforementioned APL patterns, but closer to 2.3 with normal windows. Fortunately, we didn’t have to make any radical adjustments with the 10-point controls – just a bump here and there – to at least get flat gamma tracking during the test measurements. Inevitably, it’s not going to stay totally accurate during real world viewing, though. From past experience, that hasn’t really been a problem in practice.
Pre-calibration, the TX-P42ST60B’s colour accuracy was good, although both the red and the green gamut points were desaturated in the “Normal” mode and oversaturated in “Native”. Neither errors were huge.
 |
| Pre-calibration colour saturation tracking |
![Pre-calibration Gamut Luminance levels in [True Cinema] mode](https://www.hdtvtest.co.uk/news/wp-content/uploads/2018/04/hdtv_Panasonic-TXP42ST60_pre-glum.png) |
| Pre-calibration gamut luminance (coloured bars = targets; black bars = measured values) |
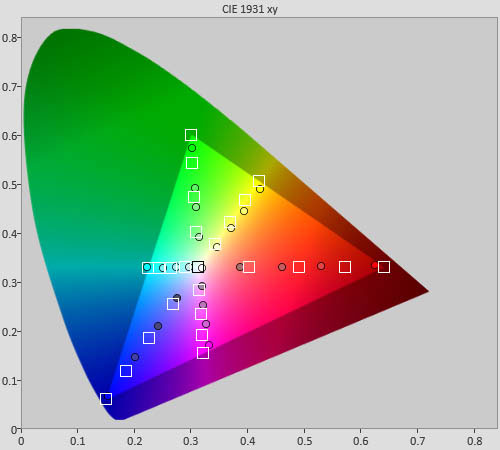
Post-calibration, we were left with excellent colour accuracy. We had to oversaturate the rarely used 100% red position (outer edge of the chart) in order to stop the 75%, 50%, and 25% regions – that is, the ones of most importance for accurate flesh tones – from appearing undersaturated. And, no matter what we did (including calibrating the “Native” colour gamut mode instead of “Standard”; the “Custom” mode instead of “True Cinema”), we couldn’t shift the nonlinear saturation tracking seen with green, although this wasn’t a problem in practice. Overall, the colour reproduction is marginally worse than the ST50, but it’s still excellent.
 |
| Post-calibration colour saturation tracking |
![Post-calibration Gamut Luminance levels in [True Cinema] mode](https://www.hdtvtest.co.uk/news/wp-content/uploads/2018/04/hdtv_Panasonic-TXP42ST60_post-glum.png) |
| Post-calibration gamut luminance (coloured bars = targets; black bars = measured values) |
Calibration in 3D is tremendously important for the best possible extra-dimensional picture quality, especially so when you consider that plasma display panels (PDPs), in particular, appear to have a harder time presenting neutrally coloured grey shades across all brightness levels when they’re operating in the higher refresh rate needed to make 3D display possible. On top of that, there’s also the 3-D glasses, each pair of which has their own unique tint. That means that on top of the usual calibration duties, a calibrator has to exaggerate certain colours in the picture coming out of the 3DTV, so that when it’s seen through the glasses, it appears neutral.
We attached the supplied pair of active-shutter 3D glasses to the front of our Klein K-10’s lens and began measuring:
3D greyscale neutrality, compared to a lot of other 3DTVs we’ve seen, was actually not too bad. Calibration does make a big improvement, but the greeny-blue tint imposed by the eyewear was a million miles better than the warm red haze of some older 3D televisions:
  |
| 3D Pre-calibration RGB tracking and delta errors (dEs) |
Calibrating in the third dimension, as usual, wasn’t easy. As in 2D, we first of all used the 2-point control and did the best possible job we could with this. Remember that 10-point greyscale calibration on a plasma TV can be a little risky, because the greyscale mixing drifts around a little depending on the APL (the average brightness of the scene being shown). Again, that means that lining things up perfectly with test patterns might result in obviously tinted stripes of colour appearing during real world usage, when the APL changes. That means that, rather than hammering away at the 10-point controls, we simply reduced the worst of the errors – in other words, we used the controls gently. The result was a big improvement:
  |
| 3D Post-calibration RGB tracking and dEs in [True Cinema] mode |
Pre-calibration, colour in 3-D mode was fairly good, with the outer edges of the gamut actually appearing a little oversaturated (except for blue). We double checked our calibration work with saturation tracking measurements, and found no great cause for concern:
 |
| 3D Post-calibration colour saturation tracking |
![3D Post-calibration Luminance levels in [True Cinema] mode](https://www.hdtvtest.co.uk/news/wp-content/uploads/2018/04/hdtv_Panasonic-TXP42ST60_3d-post-glum.png) |
| 3D Post-calibration colour luminance (coloured bars = targets; black bars = measured values) |
| Dead pixels | None |
| Screen uniformity | Excellent |
| Overscanning on HDMI | Excellent – defeatable with 16:9 content |
| Blacker than black | Passed |
| Calibrated black level (black screen) | 0.005 cd/m2 |
| Calibrated black level (ANSI checkerboard) | 0.007 cd/m2 |
| Black level retention | Excellent – stable |
| Primary chromaticity | Excellent |
| Scaling | Excellent |
| Video mode deinterlacing | Excellent – Very effective jaggies reduction |
| Film mode deinterlacing | Excellent – Passed 2-2 PAL and 3-2 NTSC tests |
| Viewing angle | Excellent, but screen filter lessens vertical viewing angle |
| Motion resolution | Excellent (1080 lines) |
| Digital noise reduction | Excellent – optional |
| Sharpness | Excellent – full resolution, defeatable edge enhancement (avoid [1080p Pixel Direct] mode) |
| Luma/Chroma bandwidth (2D Blu-ray) | Full Luma, almost full chroma |
| Image retention | Very little |
| Posterization | Very small “hardened” edges during fast motion, moreso with very fast motion and high output rate (50hz content outputs at 100hz) |
| Phosphor trails | Very mild |
| 1080p/24 capability | No judder in 2D or 3D |
| Input lag | 47ms+ compared to lag-free CRT (see notes) |
| Full 4:4:4 reproduction (PC) | Yes, with [1080p Pixel Direct] enabled, but [HDMI Content Type] must be set to “Photo” to avoid severe sharpening artefacts |
| Default [Normal] mode (2D) | 111 watts |
| Default [Normal] mode (3D) | 162 watts |
| Calibrated [True Cinema] mode (2D) | 136 watts |
| Calibrated [True Cinema] mode (3D) | 226 watts |
| Standby | 1 watt |
Measurements taken with full 50% grey screen.
| Jump To: 1. Design & CalibrationNext: Performance |
jQuery(document).ready(function($) { var toc = $("#tableofcontents").html(); $("#tablecontents").html(toc); });